
Welcome to our comprehensive guide on how to add categories and manage menus in your AspectCart online store! Properly organizing your product categories is crucial for an intuitive shopping experience, and creating a well-structured menu further enhances navigation. In this guide, we will cover both aspects to ensure your store is efficiently organized.
Why Use Categories and Menus?
Before diving into the steps, let’s discuss why categories and menus are essential:
- Improved Navigation: Categories and menus help customers find products easily.
- SEO Benefits: Well-organized categories and menus can improve your store’s search engine ranking.
- Enhanced User Experience: A structured store boosts customer satisfaction and increases repeat business.
Step 1: Log in to Your AspectCart Dashboard
First, you need to log in to your AspectCart account. Ensure you have administrative privileges to make changes to your store’s layout and product listings.
- Open your web browser and go to the AspectCart login page.
- Enter your username and password.
- Click on the “Login” button.
Step 2: Navigate to the Categories Section
Once you are logged in, follow these steps to access the categories section:
- From the dashboard, look for the “Products” menu on the left-hand side.
- Click on “Categories & Menu” under the Products menu. This will take you to the categories management page.
Step 3: Add a New Main Category
Now, let’s add a new main category to your store:
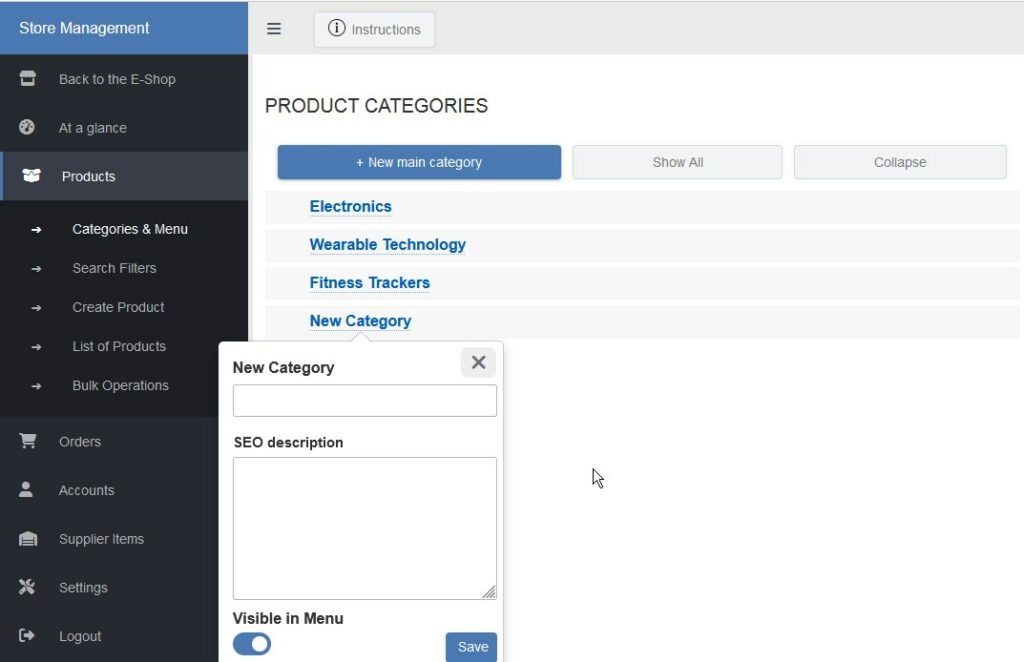
- On the categories management page, click on the “+ New main category” button.
- A popup form titled “New Category” will appear.
Step 4: Fill in the Main Category Details
In the popup form, you need to provide several details about the main category:
- New Category: Enter a name for your category. Choose something clear and descriptive.
- SEO Description: Provide a brief description of the category. This helps with SEO and gives customers more context.
- Visible in Menu: Check this box if you want the category to be visible in the store menu.
Step 5: Save Your Main Category
Once you’ve filled out all the necessary information, click the “Save” button at the bottom of the popup. Your new main category will now be added to your store.
Step 6: Add Subcategories
To create more specific subcategories under a main category:
- On the categories tree, find the main category to which you want to add a subcategory.
- Click on the “New subcategory” icon on the right side of the main category.
- A popup form similar to the main category form will appear.
- Fill out the form with the subcategory details (name, SEO description, visible in menu).
- Click “Save” to add the subcategory.
Step 7: Automatic Menu Creation
AspectCart allows you to automatically create a menu from your categories:
- Navigate to the “Categories & Menu” section from the dashboard.
- Click on “Automatic Menu Creation” to generate a menu that mirrors your category structure.
- If you need a different order or additional/fewer branches, you can edit this manually.
Step 8: Customize the Menu
If you want to enrich your menu with additional branches, such as internal or external links, follow these steps:
- In the Menu section, click on the “+ New menu item” button.
- Use the provided form to add new branches to the menu.
- Fill in the details for the new branch (Menu title, URL).
Step 9: Reorder the Menu
To reorder your menu:
- Select the branch you want to move with the mouse.
- While holding down the left button, move the selected section.
- The menu tree will open up space according to your movement to place the selected branch.
Tips for Effective Category and Menu Management
- Keep It Simple: Avoid overloading your store with too many categories. Aim for a clean, intuitive structure.
- Use Clear Labels: Category and menu names should be straightforward and easy to understand.
- Regular Updates: Periodically review and update your categories and menus to reflect new product lines or changes in inventory.
Conclusion
Adding and managing categories and menus on AspectCart is a straightforward process that can significantly enhance your store’s organization and customer experience. By following this step-by-step guide, you can create a seamless shopping experience that keeps customers coming back.
Happy selling! If you have any questions or need further assistance, feel free to reach out to the AspectCart support team.
We hope this guide was helpful! Stay tuned for more AspectCart tutorials and tips to optimize your online store.
It’s true that category management can feel endless, but it seems like you’ve nailed it! I’m really looking forward to learning more about your innovations.
You’ve made navigating categories and menus look effortless. I’d love to see even more features like this in the future.
I found your insights on adding categories and menu really valuable, especially your point about automating the process. It gave me a new perspective!